Sunday, September 7, 2014

Mini Wedding Album

Hi there, I have you seen the Albums Made Easy albums and journaling cards from We R Memory Keepers? I'm loving these little albums, they are perfect for creating a small albums for an event or vacation.  Check out this mini album I created using the Studio Gold and Metallic collections.  


These albums have a new ring binder system on the inside and have small page protectors that measure 4" x 4", some of which have 4 smaller divided sections.


Here's a look at my first page.  I simply inserted this pre-made card into the page protector.  Now I could have left this as is but I thought it would be nice if I added a little something to it.  So I used my platinum Stickles to trace over the word "still", I did this on the outside of the page protector to add a little dimension to the page.


The Studio Gold collection contains both 4" x 4" and 2" x 2" pre-cut cards.  The metallic collection contains 4" x 4" and 2" x 2" of pre-cut vellum squares.  Here, I layered a vellum page over a paper page and added my journaling to the vellum.  And, while it's a bit hard to see, I embellished the photo on the right by adding Stickles over the bouquet of flowers.


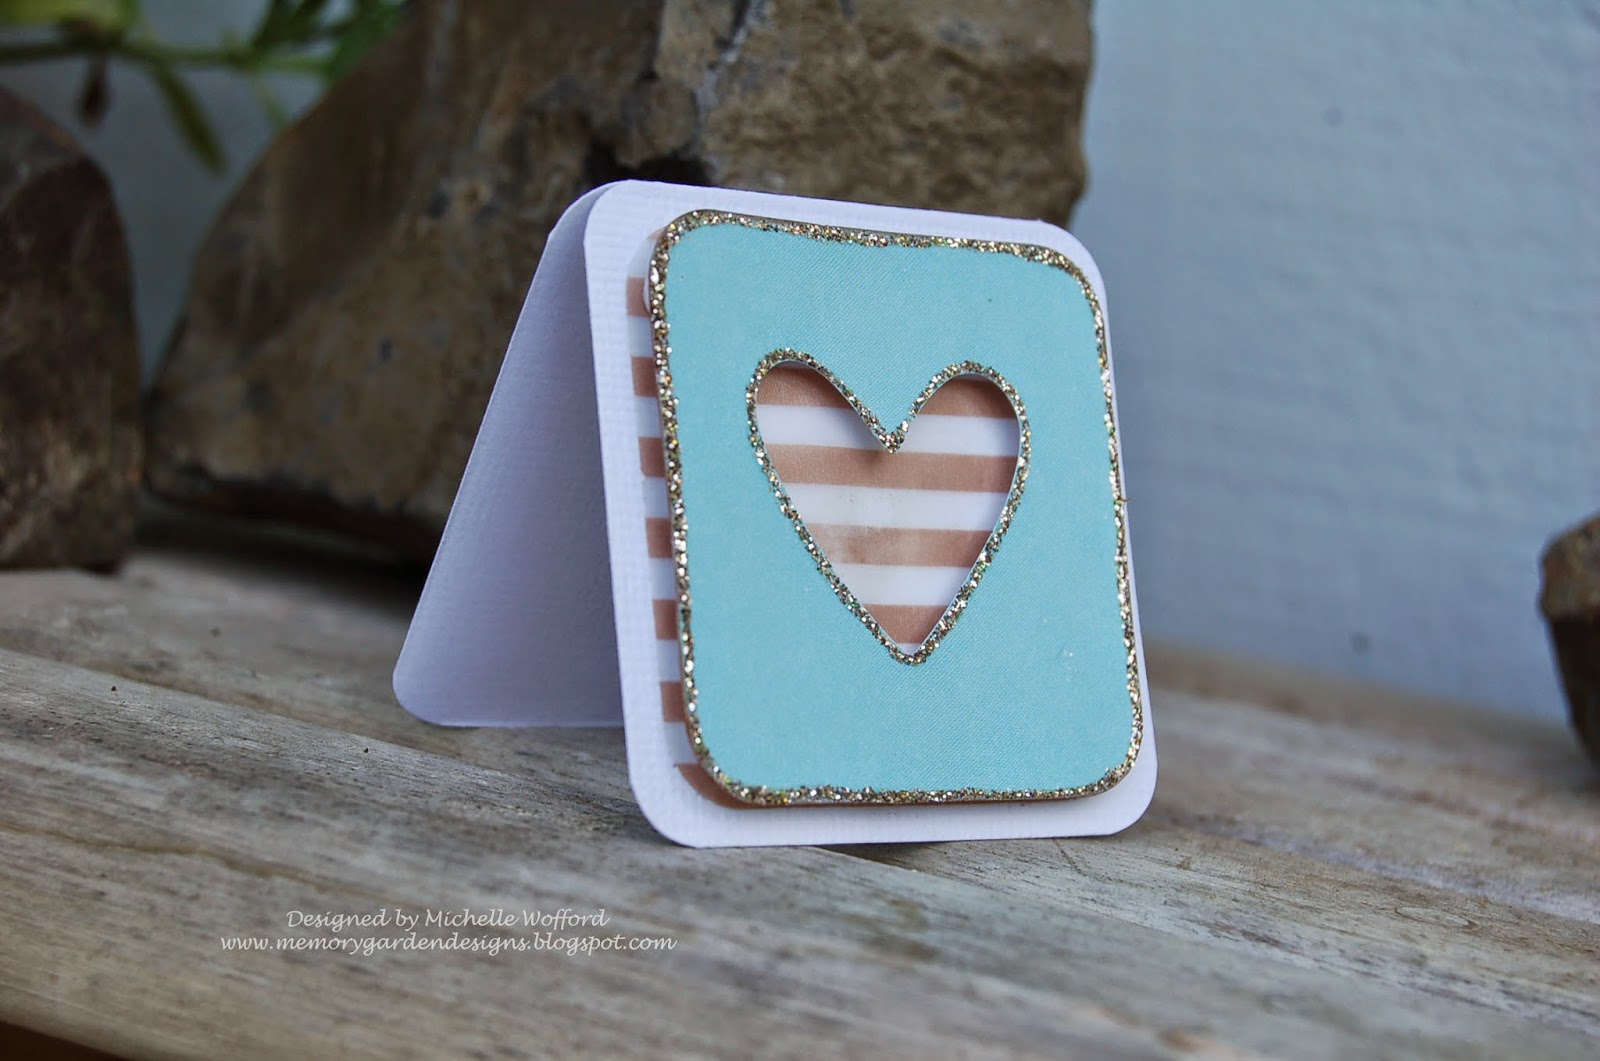
Check out this divided page.  I love these little 2" cards, especially with the die-cut centers.  I layered this one with a striped piece of vellum and added some Stickles to highlight the dots.


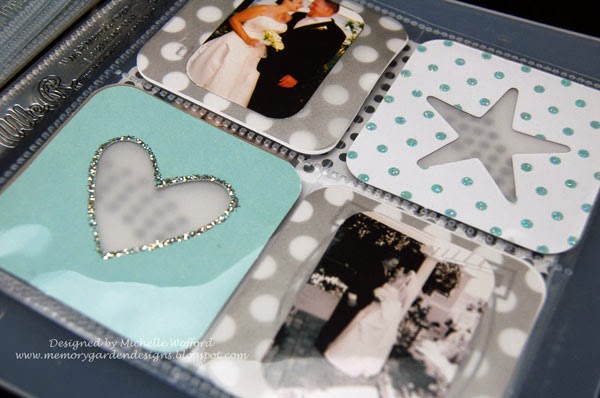
For this page I used a die-cut 4" square that is cut to look like a Polaroid picture and turned it on it's side to frame this picture. 


How fun is this layered look!  I had a smaller picture that was the perfect height for the smaller divide pages.  There was no good spot to cut the photo in half so I layered it in the center over vellum squares that are layered with die-cut journaling cards.  


Here's the back side of that page.  I added some Stickles covered wood veneer stars from Studio Calico.  I then attached these to the outside of the page protector.


Here's another page where I traced the writing on the outside of the page protector with Stickles.  Stickles are great for this, as it has a fine tip for applications and makes it easy to trace fine details.


More Stickles here, and I love the combination of the cards with the vellum.  


Here's the back side of the star and heart page.


I love how this little album turned out. And they are perfect for those who use Instagram or phone cameras and the smaller photos.

 
Thanks for looking!

Saturday, August 23, 2014

Cards Made Easy!

Hello, today I've been playing with some new pieces from We R Memory Keepers, Albums Made Easy sets.  In particular I've been playing with the die-cuts and journaling cards from the Studio Gold set by Teresa Collins and the Sheer Metalic Vellum set.  I love these sets, not only are they great for creating fast and cute mini albums but they can be used for cards and other projects.  So check out these cute cards I made with these awesome sets.  


Each set comes with cards large cards that are 4" x 4" and 2" x 2".


For this first card I trimmed a piece of cardstock that was 4 1/4" x 8 1/2", score on the length at 4 1/4" and fold in half to create a card base that is 4 1/4" x 4 1/4".  Then I used the We R Memory Keepers corner chomper to round the corners using the 1/4" size.


On the inside of the card I used a mini distress ink pad to distress the edges of the card.


Now the card Shine's like a star.


For the mini card I used this cute 2" x 2" card with a heart shape cut out of the center.  I added some stickles to accent the heart and the outer edge.


Same process for this mini card base just start with a cardstock trimmed to 2 1/4" x 4 1/2", score and fold in half.  


I used pop up adhesive to layer the open heart over a decorative vellum square from the sheer metalic set.  


These also make a great simple tag.  I trimmed a square of cardstock to 2 1/4" x 2 1/4", distressed the edges and attached a die-cut card that says thank you, perfect for attaching to a small thank you gift.


Supply List

Albums Made Easy Studio Gold Cards
Albums Made Easy Sheer Metallic  Vellum Cards
White Cardstock
Distress Ink and Applicator
 Stickles
Paper Piercer
Embroidery Floss
Adhesive


Thanks for looking!


Thursday, August 14, 2014

Dream Medallion Wall Hanging

Did you hear the news? Craft Warehouse had announced their 2014 Design Team. I'm excited to be returning as a member of their core team, they are a great company to design for. You can check out the entire team here

Today I want to share my latest project, a wall hanging made of accordion fold medallions using fun patterned paper and some awesome chipboard letters.


I love these chipboard letters because of their size and how versatile they are.  They are great for a decor piece like this or for banners.  


For details on how I finished the letters and how I made all those medallions with some fun paper from Echo Park, check out my post on the Craft Warehouse blog with a step by step tutorial, here.


Monday, August 4, 2014

Floral Doily Card

It's August, welcome to my favorite month! Though in Oregon we tend to get a little rain mid month in August, I still love this part of summer. Today I wanted to share with you this quick and simple card I made with an acrylic card base, a pretty die cut and a flower.


The acrylic base was already scalloped and it turns out that this floral doily punch works perfectly with it.  Simple, yet elegant.  A great card for any occasion or no occasion at all.

For more details on how to create this card, check out my post here, on the ScraPerfect blog.


Thanks for looking!


Sunday, July 6, 2014

Patriotic Star

Hello all, I know I'm a couple days late for a 4th of July post, but it's still patriotic and it's still 4th of July weekend so I hope you enjoy this fun patriotic star.


Here's the finished star.  The base is a chipboard shaped star, I attached festive paper to it and added some fun embellishements.


You can see more details for this project on the ScraPerfect blog here.  

Hope you are having a fabulous 4th of July weekend!


Thanks for looking!


Wednesday, June 25, 2014

Summer Wreath

In honor of recently having the first day of summer I wanted to share with you a simple summer wreath.


The rosettes were created using the Tim Holtz medallion die and fun bright patterned paper from Doodle Bug Designs.  The center medallions are attached using the Best Glue Ever.


Thanks for looking!


Monday, June 9, 2014

Father's Day Cards!

Happy June everyone, can't believe this year is already almost half way over. And soon Father's Day will be here so I wanted to share with you a few cards I made using some fun laser cut tools to make some awesome and unique Father's Day Cards.


All these cards feature the mini laser cut wood tool set from Unique Laser Designs.  Aren't they fun!


On this card I used metal brads that look like screws, I've had them forever and finally had the perfect project to use them on.


I cut the tool belt from a piece of canvas and distressed it with some Tim Holtz distress ink.   I just winged it when I cut it, I didn't measure anything on this one.


And finally here's a close up of the tool box, this one is my favorite.  I searched for a pattern to make a tool box shaped card so I had to create my own from scratch.  I think it turned out pretty well.


A peak at the inside shows a little shelf I made for the inside that holds all the little tools.


Thanks for looking and Happy Father's Day!

Monday, June 2, 2014

You Are A Star Card

Hey Everyone, sorry for being missing in action for a bit but I'm coming back from a much needed blogging vacation. But I'm back and have some great new projects to share with you this month. My latest project is a simple card that is quick, easy and versatile.


To make this card I used two pieces of patterned paper, stickers and 5 small laser cut stars.  I left the stars unfinished for this first take, I think they are nice just the way they are. And if you swap out the color of the paper for a blue or green, you'd have a nice simple masculine card.


Or you could add a little bling to the stars by adding stickles or glitter to them to make them little more feminine.  Either way it's a great simple card that could be used for a variety of occasions.


Supply List
Patterned Paper
Stickers
Laser cut Stars - Unique Laser Designs


Thanks for looking!


Thursday, May 1, 2014

Love of my Life LO and Challenge

May already? This year is just flying by. But a new month means there is a new challenge up over on the Black With 2 blog.  For me this months challenge was a bit more difficult than others because it is monochromatic.

Here's the inspiration board


And here's my take on the challenge


I chose a black and white photo from my wedding.  The half circle is a piece of acrylic that I layered with a laser cut leaf that I covered with black ink.  

Be sure to check out the Black With 2 blog this month as they are announcing the new design team and there will be a lot of extra inspiration for this months challenge.


Thanks for looking!
 

Friday, April 25, 2014

Cherry Blossoms

I love Cherry Blossoms, don't you? I've yet to see them down by our State Capitol, but I have seen some gorgeous photos taken when they are in bloom. You have to be quick though before they are gone. 

 I recently came across these awesome laser cut cherry blossoms from Unique Laser Designs and came up with a way to enjoy these blossoms all the time. 


The best part about these is I can color the blossoms any way I want.  You could even go out a on limb and try an unconventional color for cherry blossoms.  For these I used a mix of gelatos to get the hue I desired.  I colored the branches and leaves with Spectrum Noir markers and used stickles for the flower centers.  I'll be entering this into the April challenge over on the Unique Laser Designs blog, you can check it out and enter one of your own creations for a chance to win.  Check out the details here, there's still time to enter, but hurry May is quickly approaching.

Thanks for looking!

Sunday, April 20, 2014

Happy Easter!

\
Happy Easter!!! 

Today I wanted to share with you this mini Easter Basket, the perfect size for a small gift or gift card.  The basket is made from a die cut shape.  I cut it in half to form basket.  If you like to see more details check out the ScraPerfect Blog here.

Have a Blessed day!!


Thursday, April 17, 2014

Tic Tac Toe

Hello! Today I wanted to share a simple game of tic tac toe. 


Check out how easy it is to take this unfinished board game from Unique Laser Designs, to...


...This, a fun tic tac toe game board with vibrant color and sparkle.

The base and the grid come unattached so it's easy to color different colors.  I used twinkling H2O's for all the pieces, all different colors that really pop off each other and they all have a bit of sparkle to them.  Wouldn't this make a great gift.  Check out the tic tac toe board here and all the other awesome goodies from Unique Laser Designs here.

Thanks for looking!